
AI Agent configuration for automatic customer responses
Jivo has launched a new feature: the AI Agent, which helps automate customer support and handle complex tasks without human operator involvement.
The AI Agent can:
- Automatically collect contact details left by visitors in the chat;
- Add tags to conversations;
- Analyze the sentiment and tone of messages.
In this guide, we will explain in detail how to configure it.
To enable the feature, you need to purchase the "AI Agent" module in the Extensions → Modules section.
Content:
- Main Settings
- Add information for responses
- AI Agent instructions
- AI Agent knowledge base
- Editing AI Agent settings
- Additional AI Agent features
To complete the configuration, access the Jivo app and go to Extensions → Options.
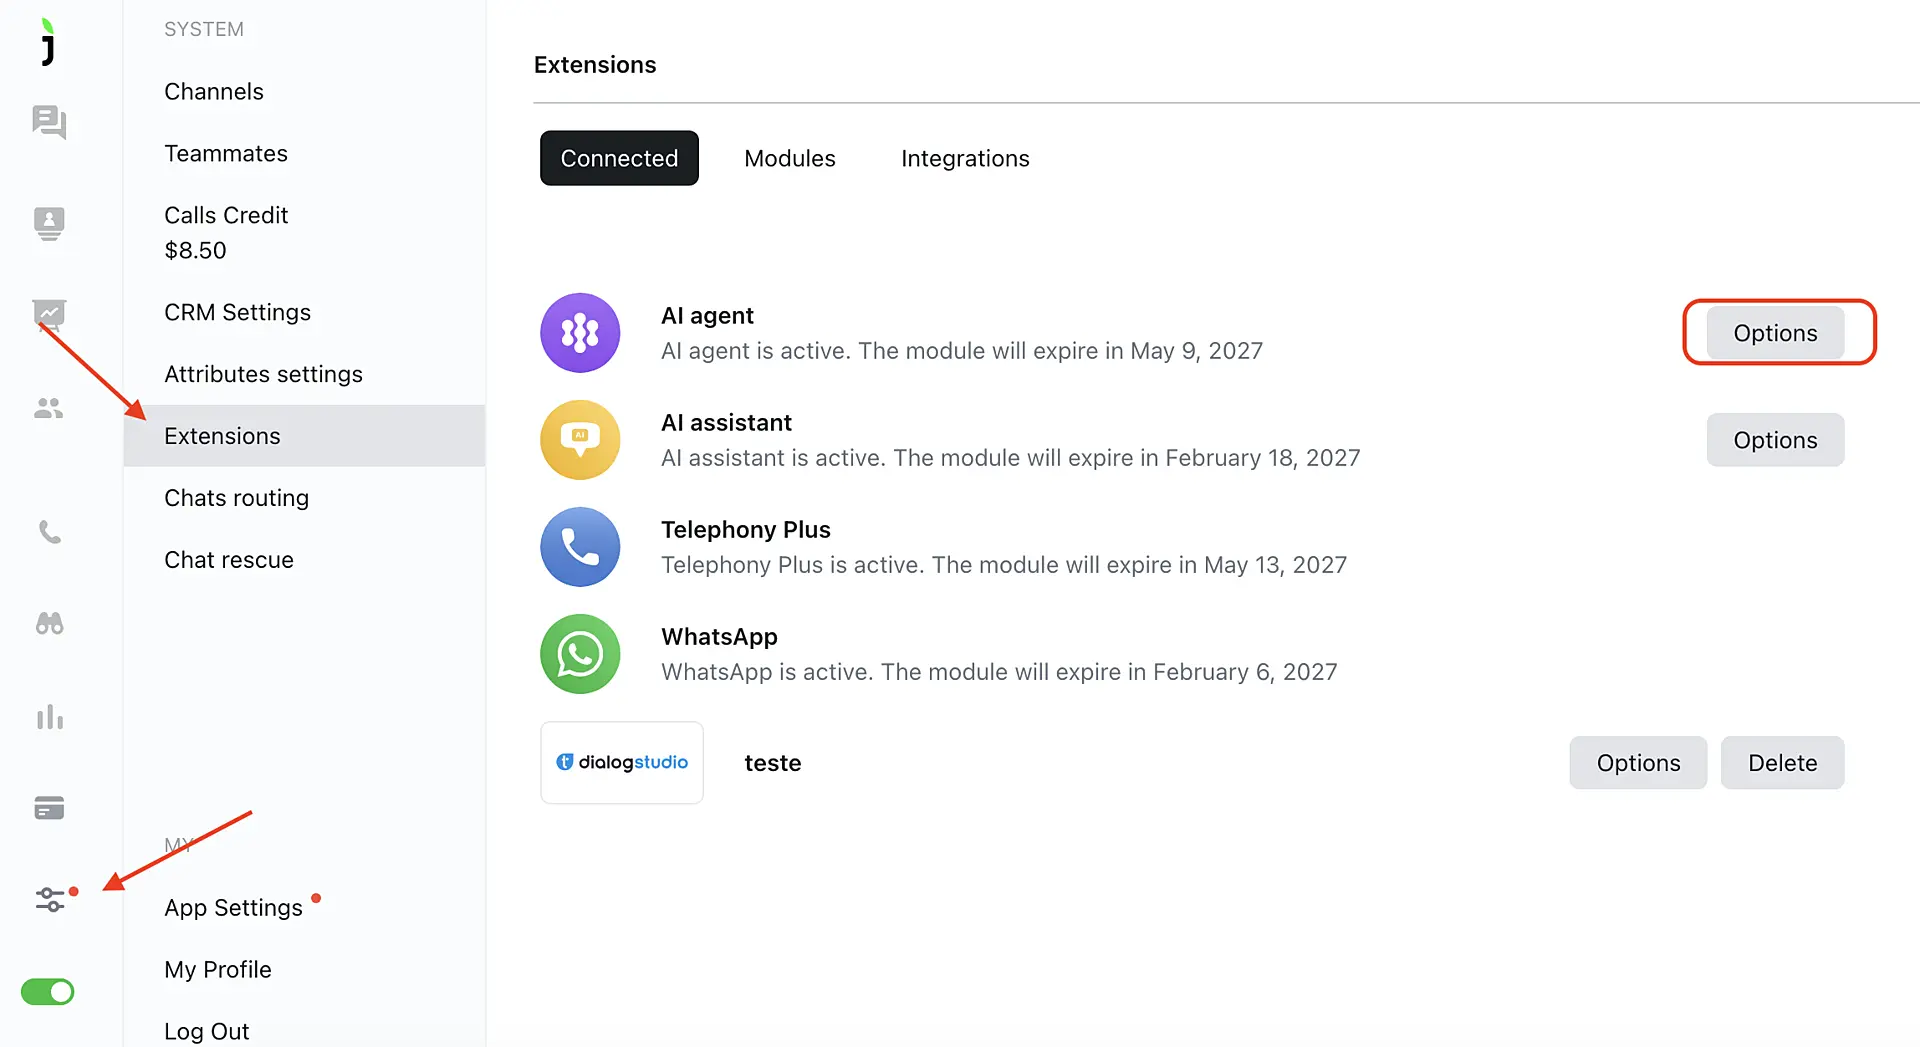
Main Settings
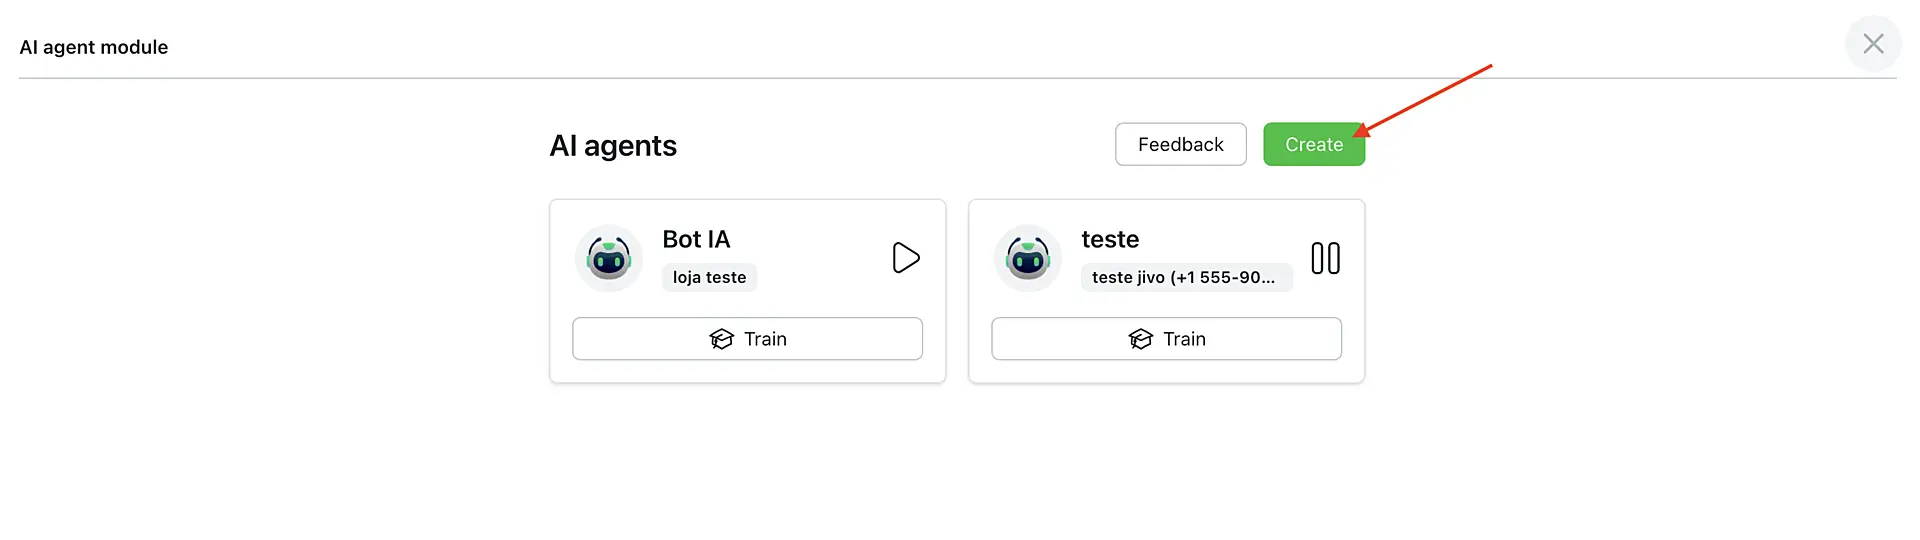
In the field that will open, click "Create". You can add up to 15 AI operators.
To create an AI operator, enter your website address and click "Continue".
The system will scan the public pages of the website and extract basic information such as contacts, addresses, topics, products, and services, as well as the communication tone. Then it will automatically generate a suitable set of settings.
If you want to skip this step or do not yet have a website ready, click "No website".
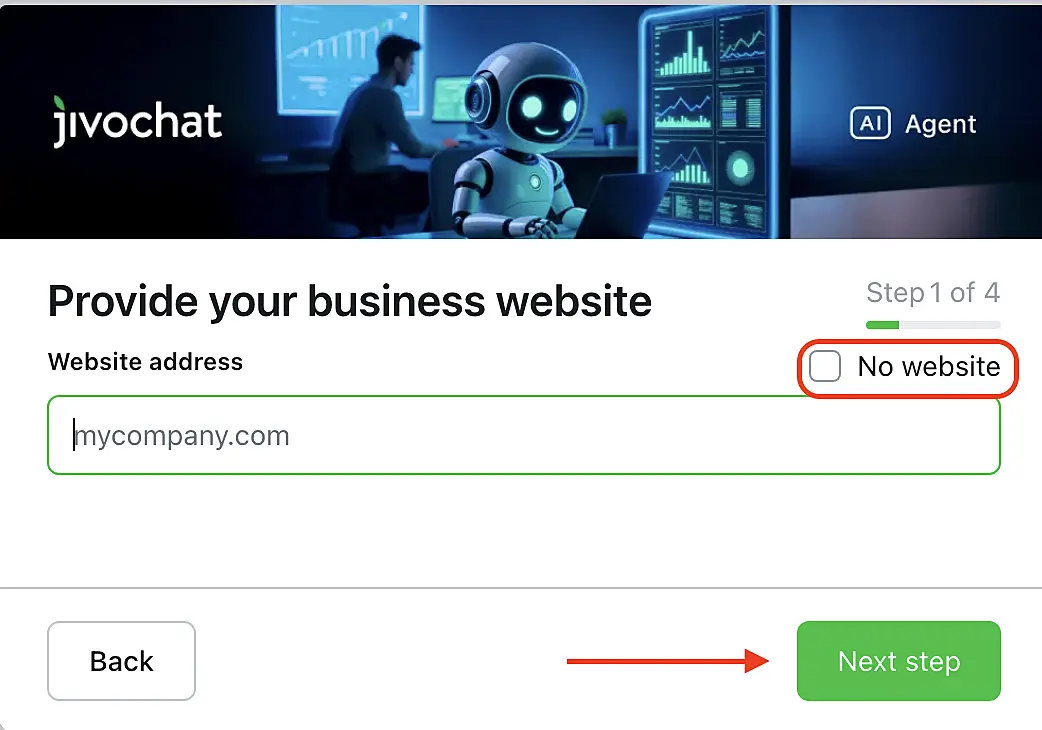
After clicking the "Continue" button, the scanning process will start automatically. It usually takes up to five minutes. If something goes wrong, we recommend stopping the process and starting the creation again.
After the website analysis, you will see the following message: "The AI has analyzed your website and filled in the fields. Review and edit if necessary."
You can edit the name and "Details" immediately or do it later.
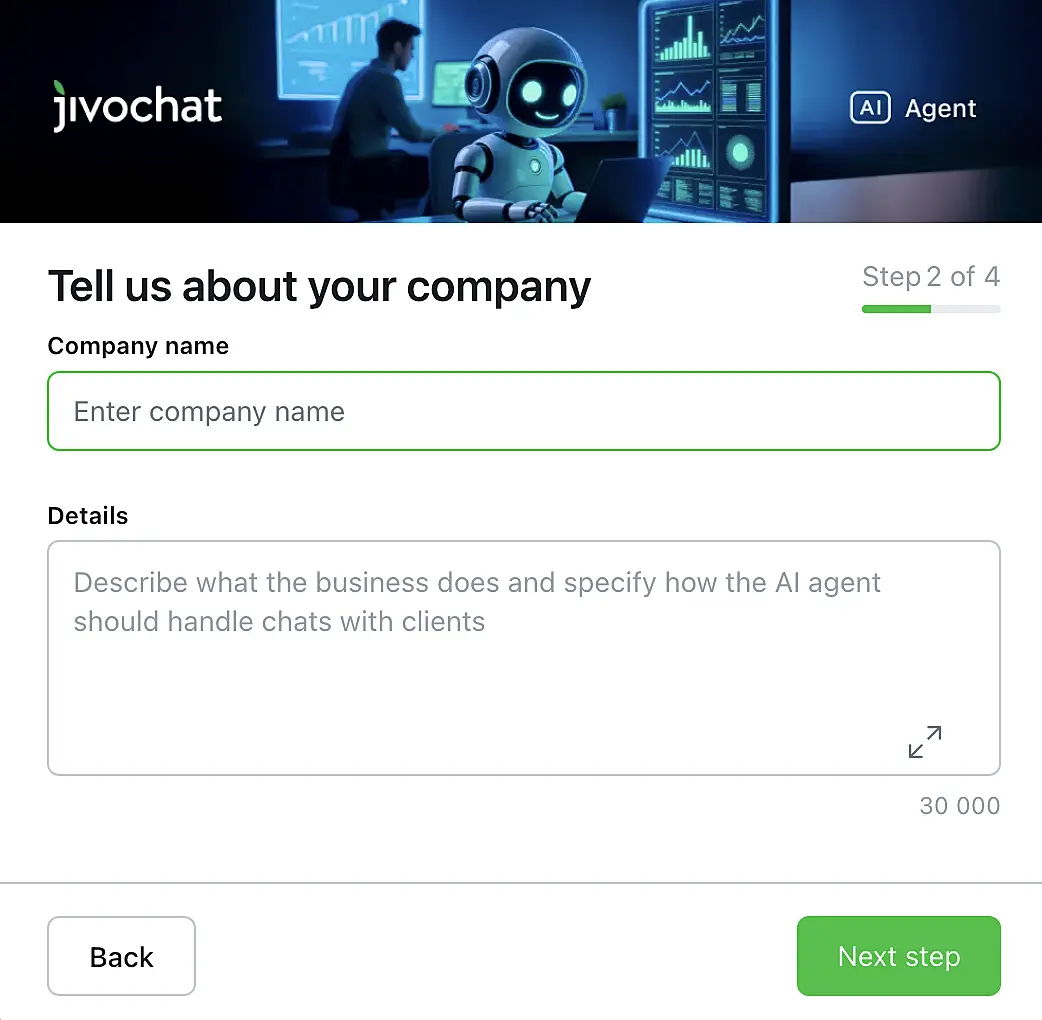
To proceed to the next configuration step, click "Continue".
In the next step, you will see the "Contacts" field. Check if everything is correct and click "Continue".

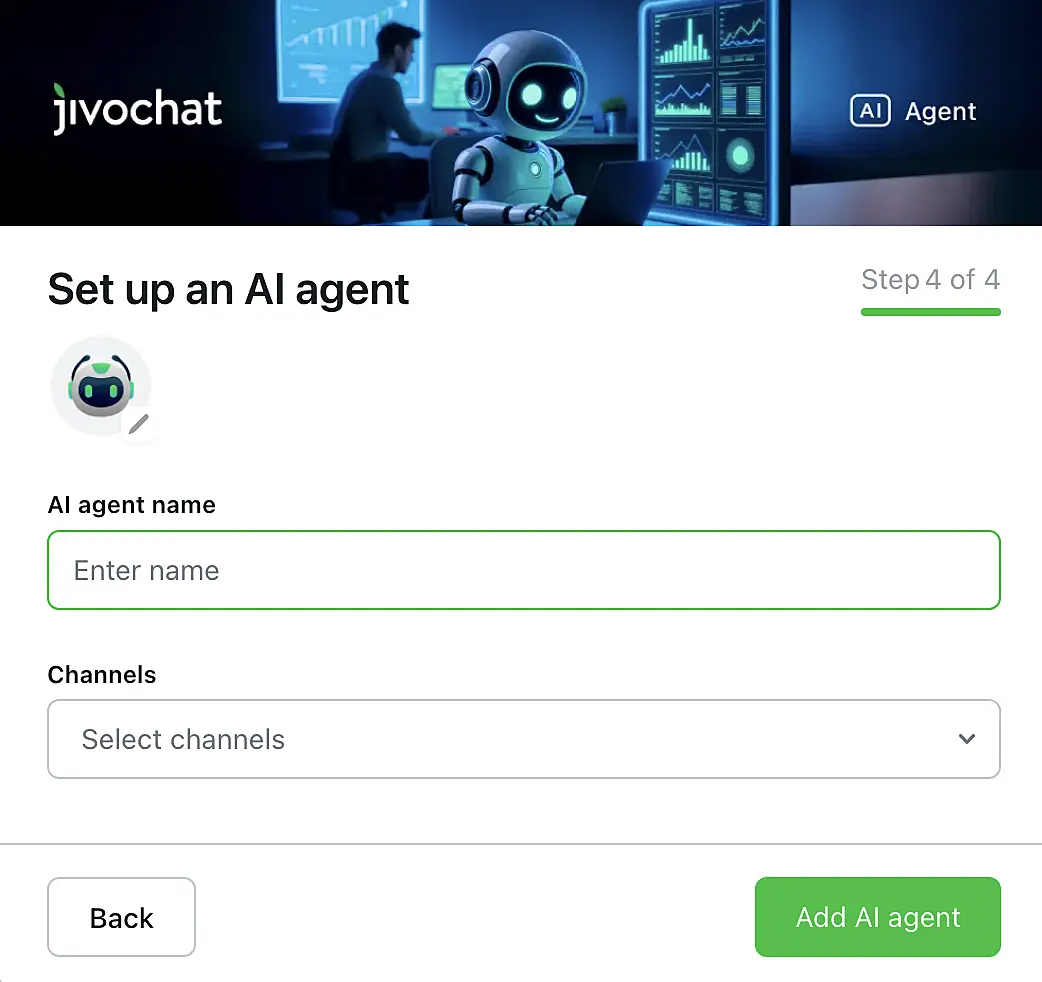
Now upload the AI Agent’s avatar and enter its name. They will be displayed in the chat to your website visitors.
Also select the channels where the AI operator will work.
Tip: To test how it works, you can create a separate channel called "Chat Page" by following our instructions and assign the assistant only to it. Later, you can change the connection channels in the same settings.
Click "Add AI operator".
Add information for responses
After creating the bot, the system will automatically suggest adding files and documents to improve the quality of the responses. Click "Add documents".

In the opened settings, you can also review the result of the website analysis and add any necessary information that the AI Agent should use when communicating with customers. Fill in the fields with as much detail as possible, as this will help make the responses more accurate.
Enter the company name and contacts:
- Website link
- Contacts: phone, email, messaging apps
- Address
- Social media links
In the "Details" section, add useful information for responses:
- Description of products and services (main names and prices)
- Delivery conditions (timeframe, cost, service regions)
- Payment conditions (methods and rules)
- Return policy (process and deadlines)
- Other relevant information
AI Agent instructions
In the "Details" section, you can describe the action flow and the logic of how the AI Agent works.
Important: all instructions must be added only in this section. If they are sent in a file, they will not be interpreted as a prompt.
The AI Agent understands the Markdown format, so you can use headings, lists, bold text, and other formatting to better organize the content.
What instructions can be defined:
Instructions for special situations. Define how the AI Agent should behave in specific scenarios, such as non-standard cases or conversations with dissatisfied customers.
When to close the conversation. The AI Agent can automatically end a conversation without transferring it to a human operator. To do this, include the instruction "End conversation" in specific situations. Example: "If the customer confirms that their issue has been resolved, end the conversation."
When a conversation is closed in this way, the chat will be moved to "Contact Center" → "All", and the conversation information (including message history) can be sent to the CRM via the "Chat ended" event.
When to request customer contact details. The AI Agent can request the visitor’s phone number and email and automatically save this information in the contact section of the chat panel.
Practical examples of instructions are available in the article "Tips for configuring AI Agent prompts".
AI Agent knowledge base
In the "Sources" → "Knowledge Base" → "Files" section, you can upload up to 5 files that will help the AI Agent provide more accurate responses.
The files may include:
- Frequently Asked Questions (FAQ): common customer questions and their answers.
- Product and service knowledge base: descriptions, features, and usage instructions.
- Price tables: updated product or service pricing.
- Store contacts and addresses: information about branches and points of sale.
- Product usage recommendations: guidelines and best practices for customers.
- Legal information: privacy policy, terms of use, and contracts.
- Marketing materials: promotions, discounts, and special offers.
Important: The AI Agent supports the following file formats: .docx, .pptx, .csv, .html, .rtf, .xlsx, .xml, .md, .txt, .json, and .pdf. The maximum allowed file size for each file is 30 MB.
Click "Upload" and select the desired file from your computer. The upload will start after clicking the "Add AI Agent" button.
In the article "Tips for creating a knowledge base for the AI Agent", we have compiled recommendations on file format and content. We recommend reading it to achieve better results.
Later, you can change these settings, remove existing files, or add new documents.
When you finish the configuration, click "Save changes" at the bottom of the page.
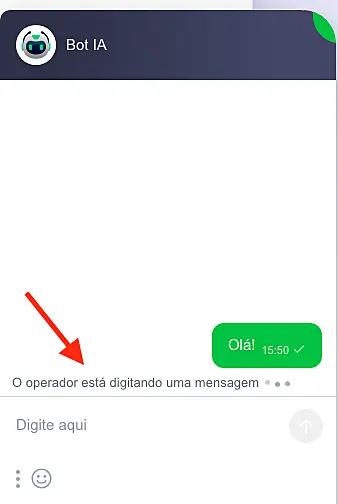
Done! Now the AI Agent will be able to assist in conversations and respond to customers according to the defined settings. While generating a response, the chat will display the message "Preparing response".
The AI Agent can also transfer the conversation to a human agent. In this case, the chat will appear for the team under "Contact Center" → "Inbox".
Editing AI Agent settings
Go to "Extensions" → "Options". A list of all created AI Agents will be displayed.
On this same screen, you can pause the assistant’s operation by clicking the "Pause" button, if you want to temporarily remove it from the support channels without deleting it.
If no documents have been added yet to assist with responses, the "Train" button will be shown. If all settings have already been completed, the "Edit" button will appear.

Na seção de configurações, você poderá alterar todas as informações definidas durante a criação, além de configurar recursos adicionais.
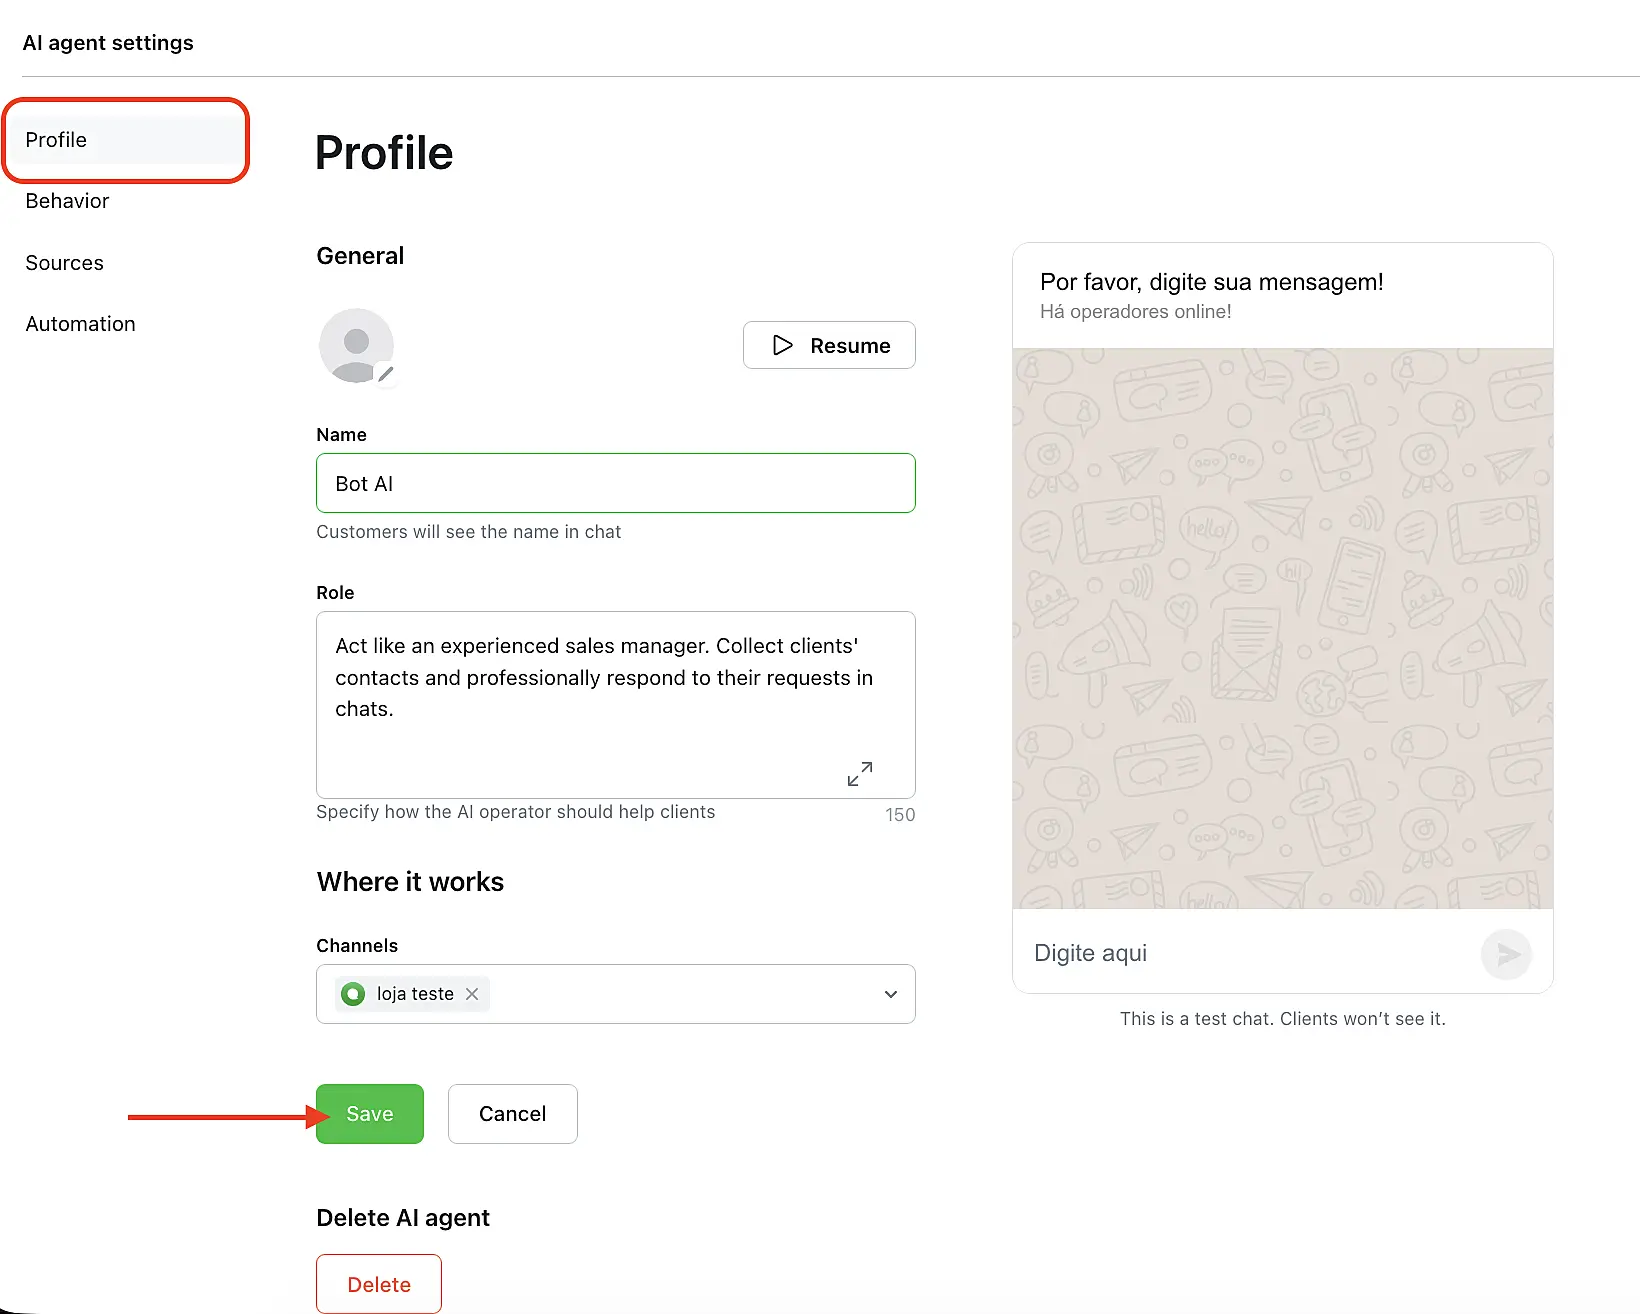
Profile
In this section, you can change the AI Agent’s photo, name, and the assignment of support channels.
It is also possible to define the assistant’s role — a set of short phrases that describe its main responsibility.
For example: "Act as an experienced support agent. Collect customer contact details and respond clearly, professionally, and objectively to chat requests."
After making any changes, don’t forget to click "Save" to apply the updates.
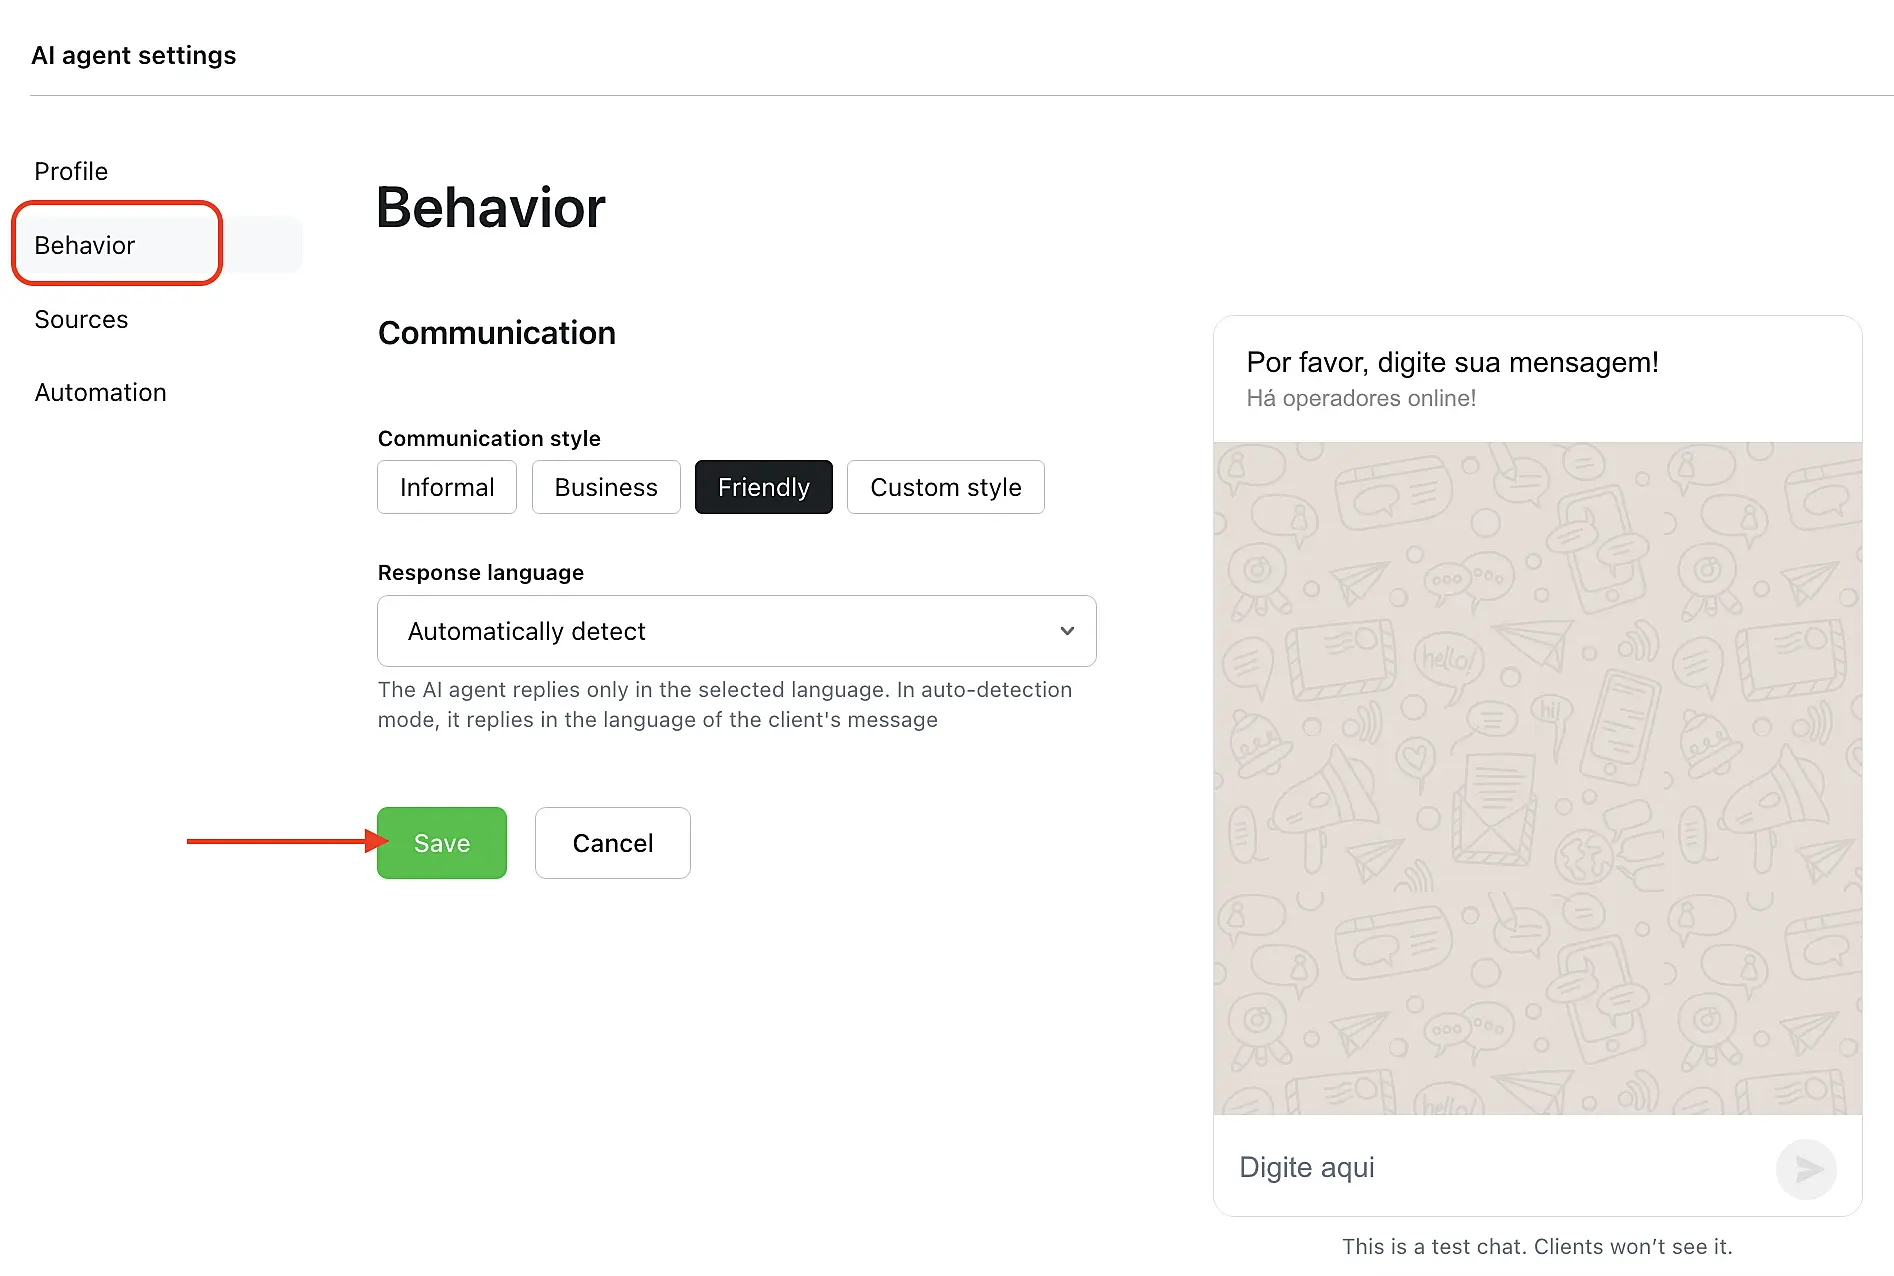
Behavior
Define the desired communication style: choose one of the default options or create your own style.
The AI Agent will use this setting to adapt the tone and form of its responses to customers. It is also possible to set the language of the responses. If you want the AI Agent to use only a specific language, select it from the list. Otherwise, it will automatically detect the visitor’s language and respond in the same language.
On the right side of the screen, there will be a test chat where you can check how the AI Agent responds.
Sources
Here is the main information gathered that helps the AI Agent answer customer questions: Knowledge Base, additional files, and FAQ. Detailed instructions for creating the Knowledge Base are available at the indicated link.
In this section, you can also enable web search. With it, the AI Agent will be able to provide up-to-date information about products, services, prices, deliveries, conditions, and promotions available on your website.
Important: Information from the website may not be updated immediately in the AI Agent’s Knowledge Base. If there is data that changes daily (such as service schedules), it is recommended to upload it manually as a file.
In the field, enter the website address and click the "+" button. It will then appear in the list below. You can add up to five domains, and all of them must be accessible without authentication.
Note: You can only add a domain; individual page URLs cannot be specified.

Automation
In this section, you can configure the messages that will be sent when the AI Agent transfers the conversation to a human operator, as well as enable additional features:
- Automatic summary when transferring the conversation;
- Spam protection;
- Date and time detection;
- Automatic tag assignment;
- Automatic collection of customer contact details from the conversation.
More details about these options are available in the AI Agent Automation Settings documentation.
Additional AI Agent features
Our AI Agent not only responds to customers but also analyzes conversations. Below we have gathered links and descriptions of useful operator features:
- Automatic tagging: The AI Agent adds tags to the conversation based on the topics discussed during the chat.
- Visitor contact identification: If the customer provides a phone number or email in the chat but does not fill out the contact form, the AI Agent can detect this information and add it to the conversation panel.
- AI quality scoring: The AI Agent analyzes the customer’s messages and assigns a score to the interaction, simulating the visitor’s own perception.
- Customer sentiment detection: The system identifies the emotional state of the conversation and classifies it as Positive, Negative, or Neutral.
- Automatic chat summary: The AI Agent generates a summary with the main request and key points of the conversation.
Now you can provide all the necessary information to the AI Agent and reduce team workload by automating customer support.
Good luck using the AI Agent!

